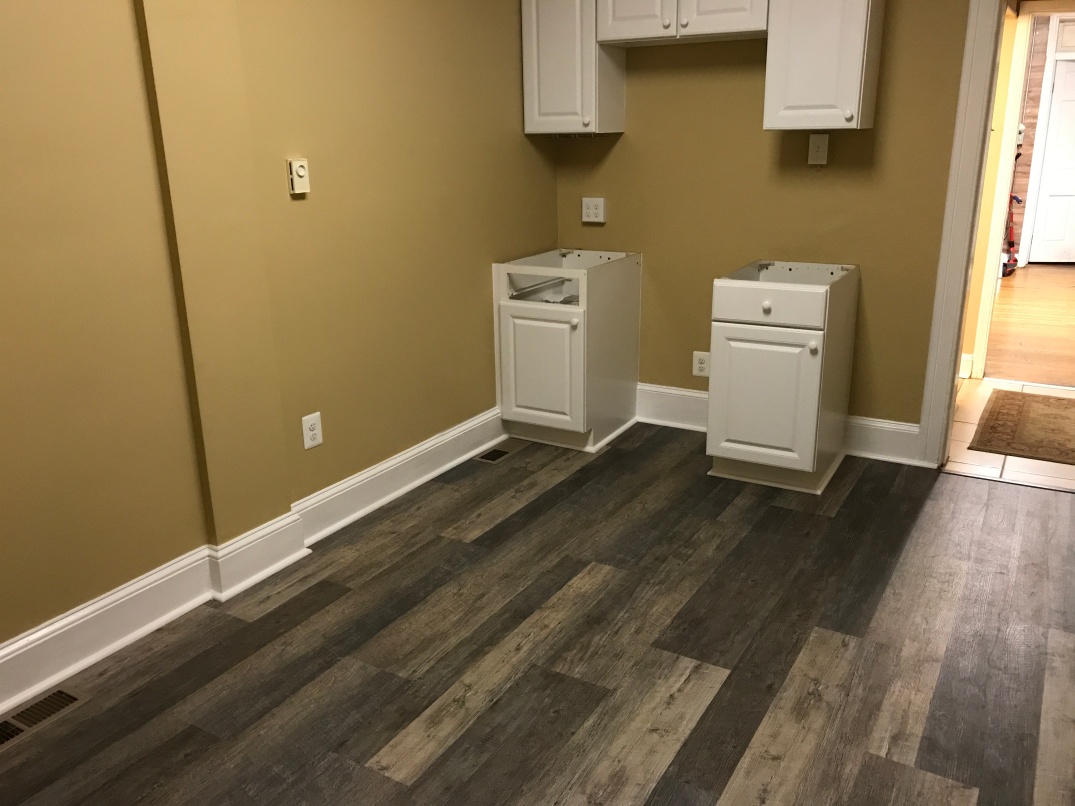
After my son went off to college, his Studio Apt. bedroom needed to go back to a functional rental space. So we decided to make it into a Spa. It needed a new floor badly, new paint and a bathroom overhaul. Here’s how it unfolded.


After my son went off to college, his Studio Apt. bedroom needed to go back to a functional rental space. So we decided to make it into a Spa. It needed a new floor badly, new paint and a bathroom overhaul. Here’s how it unfolded.
Production home builder, Keystone Custom Homes, was the Builder that was chosen to work with on this project. We took one of their models and customized it to realize the owner’s dream home. This process saved time and money which allowed the owner to get what they wanted according to budget. The normal white windows were replaced with Black Anderson casement windows and the typical light siding and trim colors were replaced with dark rustic grays and old-world taupes.
Through all of the rain during the past nine months. This Modern Rustic Cottage is finally almost move-in ready. Here is a shot to show exterior colors. The stone is still being installed on the front facade, but you get the idea.

I’m just now starting on the interior design. Here are a few photos to show the before. You’ll be surprised at the AFTER! But…. I’ll give you a little taste of what to expect. The photo below shows the Master Bedroom. The entire room, including the ceiling will be painted, and then a chandelier will be hung in the center. I’ll let you wonder how I’m going to deck out the room for a later post. The door on the right leads to the Master Bath. The initial flooring was carpet and that was just ripped out so the new flooring you now see could be installed by Home Depot. This process saves money over having the Builder do the upgrades.

The photo below shows the Master Bath with all of the tile I specified. Their are two vanities on opposing walls. To save money, the Builder installed low-end lighting and counter tops. After occupancy, the owner is going to replace the counter tops with a high-end Granite (from Home Depot) that I specified, and all of the lighting will also be replaced with a higher-end fixtures. This room will also be painted to complement the Master Bedroom.

After the reveal I will share the color choices.
See you soon with more!
I’ve been so busy I haven’t been able to catch up enough to write. But today I had a few moments to post about one of the next big things I’ll be decorating soon. A rustic Mountain Cottage being built on a 5 acre wooded lot. It’s a beautiful setting and part of the landscape (a rock ledge wall) will be incorporated into an outdoor living space. I can’t wait! The footers have been poured and the foundation walls are about to go up next. I’ll share more details as they happen so stay tuned for updates.


With the onset of text message and emails, the art of writing letters has sadly become somewhat obsolete. Today I received a note from Joanna Gaines. As busy as she is, she could have sent an email or text, but she took the time to respond via good ole standard post mail. When the mail arrived, I had been running around multi-tasking, then I saw that I received a letter and couldn’t wait to rip it open. Her handwritten note on the back of her card made my day so I wanted to share it.
It’s nice to write to someone out-of-the blue and make their day. You can create your own custom note paper by typing a large initial or monogram at the top of your page. Or any type of design you may like, along with your relevant information. Don’t be afraid to play around and come up with something that represents YOU!
Here is Chip and Joanna’s note below:

I use a note paper with my star logo at the top, then enclose it into a petal enclosure, which then inserts into a translucent envelope. You can find these online at envelope speciality sites.

Thanks Joanna, your thoughtfulness allowed me to take a few moments of time for myself to appreciate you and your words.
HUGS!!!!!

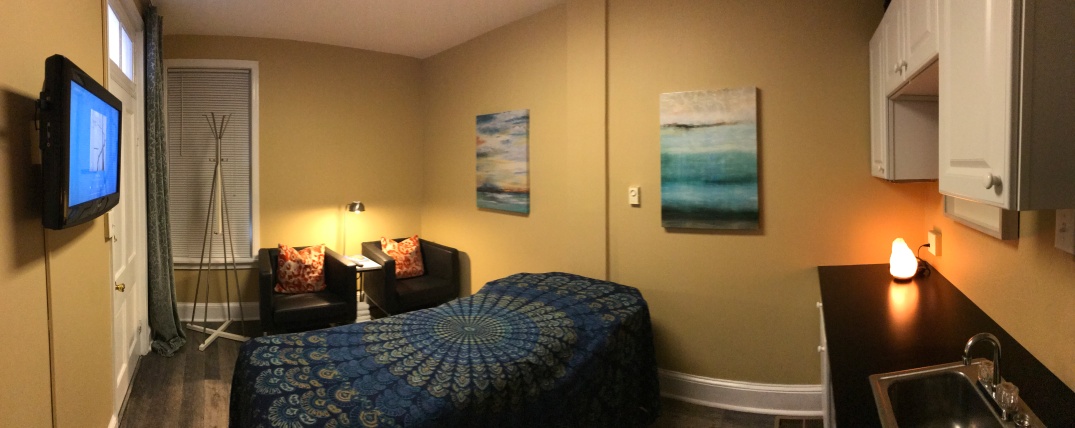
This bedroom look was inspired by the colors in the large abstract painting hanging in the room. I really love using lots of textures in my designs. And I also like unique one-of-a-kind pieces. For this room, I purchased a jute rug online; picked up the new Hooker dresser at a second hand store; bought and painted/distressed a desk from Craigslist for a vanity; reused the existing night stand; purchased the wall art which includes the color palette; purchased the gold mirror on clearance; bought the room darkening drapes online. then I finished off the look with some other existing decor items. This room came together so well. It’s stylish and yet the look is very inexpensive to achieve.
To save money when decorating a bedroom, consider using a metal platform bed frame like this one. You can purchase brackets to add a headboard if you like.
Bed linens are a combination of ivory duvet cover, throw pillows, and layered faux fur throws.
Here is a wide pan photo of the entire room. It has the feel of a trendy boutique hotel room.

Photography copyrighted by Misti Morningstar

Christmas is one of my favorite times of the year. I love having family and friends over for dinner, games, and sweets! Each year I decorate the table in a different style and color scheme. This table was especially cool because my mom had some gorgeous dishes packed away that she had never used. I was so excited to incorporate them in the design. If you are looking for dishes, you can always check out your local second hand shops, ebay, etsy, and even Goodwill.
Now, the challenge for me was to get this table done in 3 hours. Because that was all the time I had! So, to get inspired, I put all my items on the table. Just look at it!

I know it can be a bit overwhelming, but what I want you to do is think about your color palette for the table design, and then combining that with design layers to get a ‘look’. My color palette was black, white, silver, gold, and red.
I did not have any charger plates to integrate the black and white dishes into the design so I purchased these inexpensive beautiful red ones with faux diamond borders. I also purchased a gold table cloth and the silver and gold vases you see in the center of the table to hold the flowers, and Christmas poppers (I get poppers every year – they’re such fun!). You can find a selection of these items at department stores in your area. On the way home I stopped at Trader Joe’s and purchased 3 bunches of red roses.
Using the other items that I already had I began to set the table. To make interesting name tags, try using Gift Tags. I found these snowflake tags and then just used a marker to write-on the names of my guests.
To make your table look extra fancy, swirl different colors of string beads around the vases and candles. Then set a few ornate ornaments around within the beads. Play around until it looks the way you like it.
For table favors I used my own handcrafted soaps (www.savagesoaps.com) wrapped in coordinating wrapping paper. And remember you don’t need everything to be an exact match. What you want is to have a look where your items are complementing each other. As you can see my wrapping paper ties in with the red charger plates, and then I used a white ribbon to tie it into the white plates.

So there you have it. A fabulous Christmas table look with a romantic feel. Add your candles and voila! Dramatic and inviting.


I used the leftover Christmas decor on the mantle. Again, use layers to achieve a rich look. I used a long gold rope and swirled it around through objects on the mantle, similar to the way I did the beads on the dinner table. Pop a fresh evergreen wreath over a mirror with a piece of a coat hanger and place large poinsettias around the corners of your room and you’ve completed the look.


Photography copyrighted by Misti Morningstar

One of the things many homeowners encounter is the dreaded DATED KITCHEN!!!!!! Whether you recently bought a home that has a dated kitchen or you’ve just been waiting to update your kitchen because you don’t know what to do… Here is an idea that will save on replacing the kitchen cabinets.
Here is the before photo. Everything is dated. And way too much clutter.

First step, de-clutter!
Second, the plan was to keep the cabinets to save money. So I replaced the old white hardware, with silver knobs to give them an updated look.
New floor was installed. This is a tile that looks like ceramic but is less expensive.

New light fixture; new paint color (I faux painted the walls and below island); new granite counter tops; new blinds; new appliances; new breakfast area furniture.
As you can see you can make a dramatic difference without spending a lot of money!


This home was tired, rotted and dated. The community it sits within is wooded with a nearby lake, walking trails, with a bit of rustic camp feel. I felt that the home clearly needed to blend in more with the landscape, along with incorporating some modern updates.
Before.

After.
Repaired rotting wood, new paint choices, new porch furniture, outdoor patio rug, and planters make this home look entirely different!


Does your bathroom resemble this below?


Clearly in need of an update, I went to work to give this bathroom the modern update it was desperately seeking.
New paint, updated ceramic tile around the tub and shower, new pebble shower floor, new glass shower door, new window treatments, floor tile, art, and spa-like decor.

A pebble floor in the shower is easy to incorporate. The pebbles come in sheets and they are applied like ceramic tiles. The add a wonderful tactile feeling to the feet while showering.
To save money, the existing cabinets and mirror frame were painted in an expresso brown. Electrical was updated in the mirror wall to allow for a lighted wall-mount makeup mirror.
Now this bathroom has a feel of a space you’d want to relax in.

One of my businesses is natural handcrafted soaps (www.savagesoaps.com) The space is small so we wanted to reduce the footprint of the main counter and update the look of the shelving.
Here is the before photo.

I drew up the designs and then we built it. It’s modern and clean.

This antique copper pot was converted into a sink with a foot pedal. And we used existing pipe with inexpensive lacquered MDF for the countertops.

The wall signage was updated. I just got black flat paint and painted over the old image and then had our logo created into dimensional letters with adhesive backing which I then simply adhered to the wall. The sign frame is floor tile that I had cut into pieces, then I applied to the wall with construction adhesive.

The walls and ceiling were previously marble faux painted with my own special technique.
This year I decided to go the extra mile for my own Easter dinner table. When I received my April issue of Family Circle magazine, and saw the cake on the front cover, I knew right then that I was going to make it for my Easter dinner. It was beautiful and I decided to plan my whole dinner around it. So I set my mind on creating the perfect table to complement it.
It’s always a challenge to create a beautiful table setting and integrate it with your home surroundings. And for me, to do it without spending a lot of money, but also have it look like a million dollars. So I figured I would share my ideas to help you on how to create style, for your table, for less. You adapt these ideas for a wedding or dinner party too!
My first task was to come up with the centerpiece. I wanted springy shades of pinks and oranges, flowers, and bright-colored fruit. Clementines came to mind. I also really like vintage boxes and I had one that I had purchased a long time ago and thought it would work great for the flower arrangement. You’d be amazed at what items you can use that you may already have. I decided to scout the internet for some smaller boxes to flank it and then I would put the clementines in them. I found 2 little vintage cream cheese crates on ebay and I ended up winning them for only $10. I also bid and won a vintage Wm. Alexander apricot crate piece for $5.99. This was going to become a hot trivet for the table. Cork was glued to the bottom of the crates and the trivet so they wouldn’t scratch the table. I then found a glass canister with a latched lid for the pickled eggs so they would have a vintage feel as well.

I wanted each of my guests to have a table favor so I used some of my own handcrafted natural olive oil soaps, (savagesoaps.com) in a sunflower scent, and I decided I would wrap them in a beautiful pink patterned paper. Initially I thought I could go out and buy some wrapping paper for this purpose. But I had a difficult time finding the exact pattern and color I wanted, so I ended up finding a vector pattern I liked online (you can find and download these for free). Then using Adobe Illustrator, I tiled it to design a paper of my own in the shade of pink I wanted and printed them out on a color printer.
The next thing I needed was napkins – I wanted something orange with a floral pattern – and again I couldn’t find what I wanted anywhere in the form of a linen. Eventually, I found a pack of really nice paper guest towels in the color I wanted and they ended up being less expensive than buying linen napkins for a pack of 16. They cost me $5.99. I bought some round placements that were a blend of all the colors I was using and decided to use my regular white plates and a variety of clear glasses. If you have plain white plates you can do a lot with color as everything goes with white.

Ok, now I was ready to plan my menu. It was going to be simple, and stress-free so I could enjoy the dinner without having to fuss about everything. I have made a ham for years that everyone raves about (I will include my recipes below and a recipe for the day after. A soup made from the leftover ham). I decided to make the ham with a caraway gravy, mashed potatoes, homemade pickled eggs (make 10 days prior), a variation of green bean casserole, candied yams (courtesy of my mom, because she has her own killer recipe!), and of course the decadent Lemon Bundt cake from Family Circle magazine. My sister also contributed by making a fresh pineapple cake. The beverage was going to be club soda, a splash of cranberry and a fresh squeezed lime accompanied with a rose’ wine for those who wanted vino with their meal.
Just for the record, I don’t really aspire to a lot of baking, I’m more of a main course fanatic and I cook most of what I make by instinct and tasting versus a standard recipe. Flavor is important to me and I don’t like plain food — I just put ingredients together and it works. But I loved the look of this cake so much that I was willing to give baking a shot and follow a recipe.
First, I was going to need a special kugelhopf pan if I wanted to replicate the elegant shape, so I ordered it online and, wow, I received it in 2 days. The internet is wonderful for finding unique items. To save on time, I decided to set the table the day before my dinner. So I went to my local Giant supermarket for the flowers. They have an excellent variety and you can save money as well. I bought 4 packs of different shades of tulips for $6.99 each and 1 pack of orange sunflowers for $7.99, which were a perfect complement to my clementines. I was so excited! I couldn’t wait to get home to put it all together.
I spread everything out on the dining room table. Then I took the large wooden crate and I put 8 juice glasses inside of it. This way the flowers would show like they were in the crate but the glass containers would be hidden. I filled the smaller wooden crates with clementines and it looked really nice. I placed the orange paper guest towel/napkins in the center of the plate and then I wrapped and placed the pink wrapped soaps on top of the napkin. I set the table and used a variety of different clear glasses to break it up because I don’t like everything to match. Plus, I was having 9 guests and I didn’t have 9 wine glasses that matched anyway. So feel free to use a variety of items on your table, especially when it’s clear glass. It all goes together! I stood back and admired it all and was completely satisfied with the outcome.


But… I still had to shop for some Easter goodies for my son’s Easter basket so I decided to go to Walmart. Once there I saw these little pink plastic rabbit eggs. They were so cute – I couldn’t live without them! So I decided to them as additional table favors. I got a few bags of chocolate eggs to fill them. They were an adorable addition and they were only a little over a dollar for a pack of 3 bunny eggs. I took the bunnies home, assembled them with the chocolates, and added them to the table setting.

To save some additional time, I also baked the Lemon Bundt cake the night before. Just in case something should go awry, I would still have a chance to redeem myself the next day. But lady luck was on my side. The recipe was so easy and the cake popped right out of the pan after it cooled. I was so proud of myself that it didn’t fall to pieces and I felt like I was on my way to new horizons in baking. I covered it and left it overnight and decided to make the glaze and berries the next day. The next morning I shaved a little bit off the bottom of the cake to make it sit level and positioned it on a glass pedestal similar to the one in the magazine. I prepared the glaze and drizzled on top of the cake and prepared the berry mixture. I refrigerated the berries because I decided to place them in the center of the cake right before my guests arrived so they would be fresh.

I put the ham on the stove, and then prepared the green bean casserole, and peeled the potatoes. I was on top of my game and everything was so streamlined that I had spare time where I didn’t even know what to do with myself. So I spent the extra time on myself getting ready. What a treat! I showered and dressed and by the time I was done, it was almost time for my guests to arrive on the scene. I took the refrigerated berry mixture and spooned it into the center of my cake and voila. I did it!! The cake looked just like it did in the magazine.


My guests arrived and every one of them commented on how pretty the table was and how much they like the food. One guest said that my cake looked so perfect that it looked like something you’d get from a high-end restaurant. I was thrilled! Watching my circle of family around the table enjoying the meal and decor was priceless. And it all began from seeing a cake on the cover of a magazine. Thanks so much Family Circle magazine, and by the way… the cake was super tasty!
Stout Ham with Caraway Gravy 1 ham with bone (approx. 8-10 lb) 4 bottles of dark beer or enough dark beer to fill 3/4 of the pan ( I use Becks Dark) 4 cloves of garlic mashed 4-6 onions quarter sliced In a 10 qt. pan, place all ingredients. Cook covered on the stove at medium heat for approx. 3 hours or until the ham popper pops. Reduce heat to low until ready to serve. Gravy: In a 2 qt. saucepan, pour ham drippings to fill pan 3/4 of the way full and heat to medium heat. Mix 4 heaping tablespoons of cornstarch into 1 cup of cold water and pour into saucepan, stirring until thickened. Bruise 1 tablespoon of caraway seed and place the seeds into the gravy and simmer 5 more minutes and serve in your favorite gravy boat.

Pickled Eggs (Make 10 days prior) 1 large glass jar or container with lid 1 dozen hard-boiled eggs, peeled 2 cups of water 2 cups of white vinegar 1 tablespoon of pickling spice 2 bay leaves Several cloves of garlic 1 can of beets (juice only) Bring vinegar, water, spices, garlic and bay leaves to a boil in a saucepan. Let cool 15 minutes. Pour into your container. Place hard-boiled eggs into liquid and then add the juice only from the can of beets for color. Place in your refrigerator for 10 days. Serve chilled. note: You can make these without beet juice as well. The juice gives the eggs their rosy color.

Green Bean Casserole Variation 5 cans of green beans 3 cans of cream of mushroom soup 1 large onion diced 1 large can of Durkee French Fried Onions 1/4 milk 3/4 cup soy sauce fresh ground pepper 1 tsp. Place green beans in your casserole dish. Mix soup, fresh onions, 3/4 of the french fried onions, milk, soy sauce and ground pepper together in a small mixing bowl til blended. Pour over green beans and mix lightly. Bake at 350 for 25 minutes. Place the rest of the French fried onions on top and serve.

Mom’s Candied Yams 3 large or 4 medium yams cut into chunks. (Enough to cover 1 layer on the bottom of a large skillet) ½ tsp. salt 12 oz. real maple syrup 2 Tbsp of butter ½ cup brown sugar Place yams into a skillet and sprinkle with salt. Place the balance of the ingredients. On medium heat bring to a boil and cover and cook for approx. 10 minutes or until cooked through. Then remove lid and simmer until til the syrup gets thick.
Lemon Bundt Cake (see April issue of Family Circle magazine)
Mini Raspberry Cheesecakes Note: Baking the cupcakes in a hot-water bath produces the creamiest results and prevents the batter from sinking in the oven.
convert Ingredients 1 cup finely ground graham crackers (about 12 sheets; use a mini chopper or food processor) 3 tablespoons unsalted butter, melted 1 1/2 cups sugar plus 5 tablespoons, divided 1 container (6 ounces) fresh raspberries 2 pounds cream cheese, room temperature Pinch of salt 1 teaspoon pure vanilla extract 4 large eggs, room temperature
Directions 1. Preheat oven to 325°F (160°C). Line standard muffin tins with paper liners. Stir together ground graham crackers, butter, and 3 tablespoons sugar. Press 1 tablespoon crust mixture firmly into bottom of each lined cup. Bake until set, about 5 minutes. Transfer tins to a wire rack to cool. 2. Process raspberries in a food processor until smooth, about 30 seconds. Pass puree through a fine sieve into a small bowl, pressing with a flexible spatula to remove as much liquid as possible; discard solids. Whisk in 2 tablespoons sugar. 3. With an electric mixer on medium-high speed, beat cream cheese until fluffy, scraping down sides of bowl as needed. With mixer on low-speed, add remaining 1 1/2 cups sugar in a steady stream. Add salt and vanilla; mix until well combined. Add eggs, one at a time, beating until just combined after each. 4. Spoon 3 tablespoons filling over crust in each cup. Dollop 1/2 teaspoon raspberry puree in a few dots over each. With a wooden skewer or toothpick, swirl sauce into filling. Place each tin in a roasting pan (bake in batches, if necessary); pour enough hot water into pan to come three-quarters of the way up sides of cups. 5. Bake, rotating pans halfway through, until filling is set, about 22 minutes. Carefully remove tins from water bath and transfer to wire racks to cool completely. Refrigerate (in tins) at least 4 hours (or out of tins up to 5 days in airtight containers). Remove from tins just before serving.

Pineapple Layer Cake 1 (18.25 ounce) package yellow cake mix 1 (11 ounce) can mandarin oranges, drained 1 (20 ounce) can unsweetened crushed pineapple, drained 1 (3.4 ounce) package instant vanilla pudding mix 1 (12 ounce) container frozen whipped topping, thawed

The Day after Bean Soup Place all ingredients into 10 qt. pan and bring to a boil over medium heat for 10-15 min. Reduce heat to low and cover and simmer for 1 additional hour and serve with crusty bread and a fresh salad. Leftover ham cut into bite-sized pieces Leftover ham drippings 5 cans of Navy beans 2 cans of Black beans 2 stalks of celery cut into thin slices 3 medium carrots cut into thin slices 1 Tbsp. of minced garlic 1 Tbsp. Yellow prepared mustard 2 dashes of cayenne pepper 2 dashes of celery seed 1 bay leaf water as needed ground pepper to taste fresh parsley 3 Tbsp. diced *note: if you have any leftover gravy you can add 1 cup to thicken the soup
ENJOY!!!!! 🙂
Photography copyrighted 2011 by Misti Morningstar
